How to create my own Font


Hi folks... 


Are you bored from old fonts of word so just create your own fonts and use them, now you will ask me "Is it possible??", yes it is, today i'm going to teach you how to create your own fonts. In windows operating system, there is a hidden utility which lets the user to create custom fonts. So if you want to know how to create custom fonts, then read this post carefully.
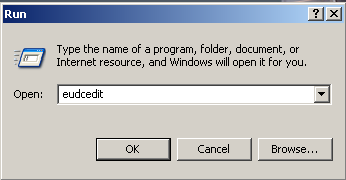
1. Go to Start Menu and open RUN. Or press win key+R.

2. Type eudcedit and press enter.


3. A new window will appear to select code. Select any code you like. I have selected 1st, i.e. E000*0


4. Now your font editor will open. You can draw your character as you draw in mspaint.


5. After finishing the custom character/symbol, go to Edit and click Save Character.


6. Now go to File and click Font Links.


7. Select from Link With All Fonts OR Link With Selected Fonts. I am selecting Link With All Fonts.


8. Now your custom font symbol is saved in the pc. To use this custom symbol, open RUN as told above.
9. Type charmap and press enter. This will open character map.
10. Now search for All Fonts (Private Characters).


11. You will see your custom symbol there. Just click on that symbol, click Select and click Copy.


12. Now paste in your text editor. You will see your new custom symbol.


Share on Google Plus

About Arjun SK

A Geek, Gadget Lover who likes to discover and write about the latest technology surrounding.Being a learner he wants to acknowledge and learn more about tech things.
Profile: Google Plus, Freelancer, GitHub, Codekrypt
    Blogger Comment

0 comments:

Post a Comment